Applying Evolv AI’s Generative AI to Your Experimentation Program

The possibilities are endless when it comes to the copy, design, functionality, and placement of your digital assets.

Should your forms be above the fold or below for higher conversions? Does the description on your pricing page encourage subscriptions or cause friction? If you autofill contact information on a checkout page, will cart abandonment go down?

Businesses that invest in experimentation programs understand the complexities of creating consistently great user experiences. They also understand that big results are the product of thousands of smaller decisions. But, for many of our customers, identifying those smaller decisions effectively and finding internal resources like copywriters, designers, and developers to help make the modifications can be challenging.

That’s why Evolv AI developed generative AI to further its continuous optimization system for expedited experimentation.

Evolv AI launched its generative AI beta program in May 2023 and has continued to fine-tune its model month-over-month. In October 2023, Evolv AI released its Web Editor 3, enabling more users to leverage generative AI for experimentation, maximizing productivity and scale.

A/B Testing Revolutionized


Unlock Unprecedented Experimentation Velocity and Scale with AI


parallax image

How to use Evolv AI’s Web Editor for Generative AI

The content below will address how to get started with Evolv AI’s Web Editor and how to access its Generative AI capabilities. For product updates and ongoing release notes, you can visit Evolv AI’s knowledge base and release notes. If you’re not currently an Evolv AI customer, reach out to gain access to the Web Editor and Generative AI.

STEP 1:

Download and install the latest version of Evolv AI's Web Editor. Click "customize".

Evolv Web Editor

STEP 2:

Inside Preferences, customize your settings to “Enable Assistant (Technology Preview)."

Enable Assistant

STEP 3:

If you’re an existing Evolv AI customer, use your login to start a new project, open an existing one. The content that follows will detail steps from starting a new project.

New Project

STEP 4:

Create a new context.

Create new context

STEP 5:

Identify the website, landing page, or digital touchpoint you want to iterate upon, and enter the URL into the system. When the experience loads, click “Create Context” on the left-hand side of the Web Editor.


Identify the website

STEP 6:

We're using Evolv AI's homepage for this example, so we’ve named the context "homepage." Once you’ve named your context, push save.


Click save

STEP 7:

Next, add components or the sections of the page you want to iterate upon. To add your components, click the “inspector” icon and select the areas of your experience you want to modify. Evolv AI’s Web Editor will populate the component title for you; however, you can rename components to help with organization as you work through other sections of your experience. To rename a component, right-click on the component and select rename.


To ensure you’ve set up your components correctly, click the hamburger menu on the right-hand side of the Web Editor. As you toggle through your components, the selector should match the component you want to update.

STEP 8:

Under the contexts section of the Evolv AI Web Editor, you will add and name your “variant.”


Name your variant

We named our variant "Hero layout".

If you use Evolv AI for Continuous Optimization and auto recommendations, the variant will be tested against control (your current experience) to see which version performs better.

Customers of Evolv AI experiment across their entire funnel, evaluating thousands of combinations concurrently.

Then, Evolv AI's Continuous Optimization feature automatically serves the best combinations of experiences to end-users in real-time.

Experimentation Summary

STEP 9:

Now that you’ve set up your project, it’s time to leverage Generative AI.

Let's start with Evolv AI's text paraphrasing feature.

Click on a component, like the H1, and ask Evolv AI’s assistant to generate content suggestions within the menu on the right.


Text paraphrasing feture

STEP 10:

See what the assistant returns, and tick the box of your desired version.


STEP 11:

Evolv AI’s description-to-design feature lets you to modify any HTML or CSS property on your site with a text prompt. For example, we prompted the assistant to add a red border to the HERO image.


You can also prompt the assistant to change spacing, margins, typography, font styles, swap  HTML from one part of a site to another, and much more. [Learn more]

STEP 12:

Evolv AI’s assistant can also generate new images or host uploaded images you've created specifically for your experiences. To add an existing image to your experiences (a great option for product-centric or custom-designed graphics), click UPLOAD & APPLY.

Upload and apply

STEP 13:

Creating new images works best for social media, blogs, landing pages, and email assets. To create new images, prompt Evolv AI’s assistant with your specifications.

As with all generative AI tools, the more specific your prompt, the better your outcome. For example:

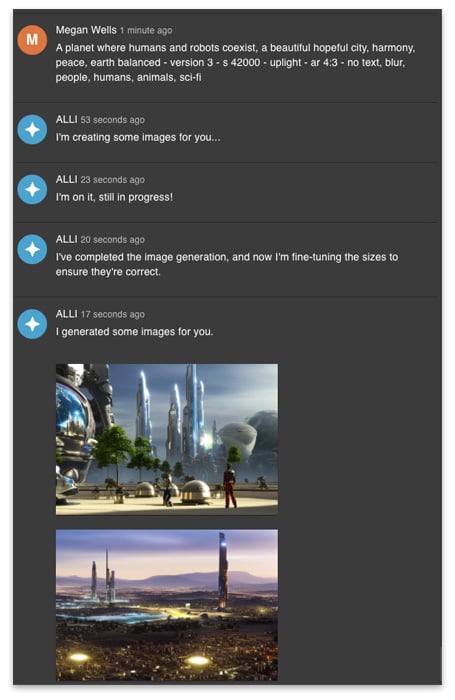
A planet where humans and robots coexist, a beautiful hopeful city, harmony, peace, earth balanced - version 3 - s 42000 - uplight - ar 4:3 - no text, blur, people, humans, animals, sci-fi.

Create new images

Generative AI is only one of Evolv AI's many features for experimentation at scale.


Want to learn more about the first AI-led experimentation platform that builds, deploys, optimizes, and recommends testing ideas for you with less risk than traditional A/B testing?


Talk to an expert